Important Things to Do Before Roof Installation
A roof protects a building against rain, snow, sunlight, and temperature extremes. The roofing material you choose can affect your home’s energy costs. You’ll also want to consider the drainage components of your roof. Downspouts can help direct rainwater away from your house. Open valleys are fitted with metal flashing.
Preparation

Installing a new roof is an involved process that includes many different steps. To ensure that the job goes as smoothly as possible for homeowners, there are a few important things they must do ahead of time. One of the most important things to do is prepare the area around the home where work will be done by Roofing Company. This will help protect the landscaping, furniture, trinkets, and other items damaged by shingles or other debris during construction. Additionally, it is a good idea to get tarps that can be placed under areas with the potential for nails or other debris to fall. This will protect the ground and make it much easier to clean up when the project is finished.
Another important step is to inspect the existing roof and make any necessary repairs. This is the only way to be sure that the new roof will be able to do its job of protecting the home and keeping it safe from rain and other weather elements. In addition, this is also the time to make sure that any gutters are in working order and free of blockages or damage.
Finally, it is a good idea to have the sheathing inspected and made ready for the new shingles or tiles. This is the inner layer of the roof that creates an outer barrier against water penetrating the house. This is usually made of plywood sheathing boards or 1 by 6 sheathing boards, depending on the type of roof. This is the time to replace any damaged or rotting boards that are found.
In this phase, flashing will also be inspected and replaced as needed. This is the metal material that is installed at the joints of the roof to prevent water from seepage. It is also used to protect the chimneys, skylights, and vents. In addition, it can be added to the ridge of the roof to provide additional protection there.
It is also a good idea to remove any children’s toys or other outdoor items from the patios or balconies near where the roofing work will be done. This will prevent the kids from getting injured by stray nails or other debris. In addition, it is a good idea to have any pets stay at a friend or relative’s house during the roofing process so that they are not disturbed or anxious.
Materials
The roof is the most visible element of any house. Replacing it with fresh materials can dramatically improve a home’s curb appeal. But a new roof also has energy efficiency benefits. If your roof reflects rather than absorbs sunlight, it can help control the temperature inside your home and reduce your cooling costs.
A new roof is a big financial commitment, but you can lower the upfront cost by choosing the least expensive materials. You can also save money by installing a roofing system that will last a long time, rather than one that requires frequent repairs.
Most homeowners choose asphalt shingles for their durability and affordability. But there are other options, including granulated metal, clay tiles and concrete tile. Asphalt shingles come in a variety of colors and styles, so you can match them to your home’s architectural style.
Roll roofing, or modified bitumen, is an inexpensive option that works well on low-sloped roofs. It has a tough, flexible membrane that holds up well in wet climates and resists punctures, tears and chemical spills. If you opt for a white or light-colored roof, it will reflect UV rays and cool your home.
If you want a roof with a more natural look, consider wood shingles or shakes. They start sandy brown and turn silver with age, and they can last 50 years or more in dry climates. Wood roofs need to be treated with fire retardant if they’re located in areas prone to wildfires.
Thermoplastic membranes (PVC, PU) are popular for flat roofs. These tough, flexible membranes are impervious to chemicals and can stand up to punctures, tears and bacterial growth. They’re easy to install, too, since they don’t require nailing or fasteners.
If you have a roof that’s in good shape but needs to be replaced, consider adding a new layer of shingle on top of the existing layers. Make sure to use No. 15 asphalt-saturated felt underlayment and lap the pieces over the lower ones by at least 2 in. This helps keep the roof deck dry before shingles go on, protects the underlying layers from moisture and prevents water leaks. Also, don’t forget to add drip edges along the rakes.
Installing the Shingles or Tiles
Installing roof shingles or tiles is a laborious and time-consuming project. It’s important to do it correctly or you could end up with leaky roofs and damaged walls and ceilings inside the house. The right techniques make all the difference and can help you get your new roof up and running as quickly as possible.
To start with, sweep the roof thoroughly and remove any large twigs or plant debris from its surface. You should also use this opportunity to inspect the ladder for safety and stability. If it’s not in good condition, it should be replaced before you attempt any work on the roof.
Once the roof is clean, you’re ready to begin laying out the shingles or tiles. If you’re re-shingling your entire roof, start at the bottom and work your way up, leaving enough space for each course of shingles to overlap the one beneath it by an inch. It’s a good idea to mark a grid pattern on the roof with a chalk line to guide you and keep the rows straight. For example, a grid with six-inch horizontal spacing and five-inch vertical spacing would be ideal.
The first row should begin with a full shingle and be nailed down to the underlayment with four or more nails. It should then be nailed to the shingle below it with an extra nail (called a starter shingle) at each end to secure it. When the last shingle of this row is nailed down, cut it to the size you need at the ridge and then bend it over the ridge and nail it again with another starter shingle at each end. This will prevent the ridge shingle from blowing away in high winds.
Some types of shingles, such as Coroshingle, require detailing strips to be fitted across the eaves, verge and ridge for a neat finish. If this is the case, follow the manufacturer’s recommended installation instructions to ensure that the details are properly applied.
You will also need to install any flashing that is required. This includes drip edge along the gutters and rake edge flashing for the sides of the roof. It is important to have this in place before you install the shingle course because otherwise water and ice can find its way underneath the shingles. In addition, chimneys and vent stacks should be surrounded with metal flashing that is laid over tar and then interlaced with the upper shingle courses.
Flashing
Flashing is a crucial part of roof installation that prevents water leaks. It’s made from thin, corrosion-resistant sheet metal bent into shape to fit a joint. When installed properly, it stops water from flowing through shingles and into the plywood decking and other components of your home. Flashing is particularly important in areas where the roof meets a wall (sidewalls and front walls), in low points on a sloped roof (called valleys), and around any roof protrusions, such as chimneys and vents.
There are several types of flashing, each designed for a particular type of roof penetration. For example, step flashing is ideal for where a dormer projects out from a wall. Without flashing, water could seep down the wall and slip past shingles into the structure. But step flashing solves this problem by lining the joint with multiple pieces of flashing that overlap like fish scales.
Another type of flashing is counter flashing. This is typically paired with base flashing and used to protect hard-to-waterproof areas, such as chimneys. Unlike base flashing, which is attached to the roof, counter flashing is attached to the wall and secured with roofing cement. This allows for expansion and contraction of the wall and roof during different seasons, reducing the risk of breakage.
Other flashing techniques include drip edges, which are installed along the edges of the roof to guide rainwater away from the fascia. Valley flashing is installed around any open valleys on the roof and helps to prevent debris build-up. Vent pipe flashing is used to seal vent pipes and other roof protrusions.
Although the installation of roof flashing seems complex, it’s a critical aspect of any serious roofing project. Getting it right ensures that your roof system is watertight and will protect the rest of your home from damage caused by extreme weather, winds, freeze-thaw cycles, and summer rains. It’s also one of the most common areas where homeowners experience leaks, which is why it’s so important to hire a roofing company that knows how to install and repair flashing correctly. Leaking flashing isn’t just a nuisance; it can cause significant structural damage to your home and lead to other problems, such as mold, rot, and insect infestations.
What Does a Chimney Sweep Do?
Whether your chimney is gas- or wood-burning, it needs to be swept regularly. When a chimney is not swept, creosote buildup can accumulate and create a fire hazard.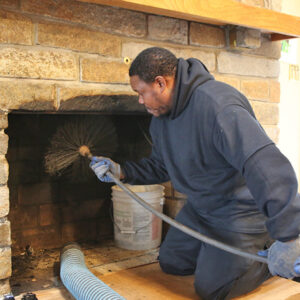
Chimney sweep uses a variety of tools to clean fireplaces, chimneys, stove flues, and other structures. They are also trained to remove drafting obstructions, such as leaves, twigs, and animal nests, that narrow the chimney and block smoke and carbon monoxide from entering your home. They are able to identify and remove late-stage creosote glaze and clean chimney flues with specialized brushes, rods, scrubbers, and cleaning solvents.
In addition to cleaning, they may be able to repair damage to your chimney and fireplace components. This can include repairing or replacing your chimney cap, grate, and firebox liner, as well as a chimney liner replacement.
A chimney that is not regularly swept can accumulate creosote deposits that are extremely flammable. If they reach the chimney liner, they can ignite and cause chimney fires that can destroy your house or endanger your family’s health. Regular sweepings will reduce your risk of chimney fires and extend the working life of your fireplace and home heating system.
Before your chimney sweep arrives, be sure that the fireplace is completely cold and that you have cleared the logs, grate, and any other obstructions from inside the fireplace. Likewise, make sure the area surrounding the fireplace is free of furniture, toys, or decorations that could get dirty or be harmed by creosote splash or spillage.
It is best to hire a qualified, insured chimney sweep. Look for a sweep who is certified by the National Chimney Sweep Guild (NCSG). Membership in these organizations signifies a commitment to high professional and ethical standards, as well as ongoing education and training in chimney sweep techniques and services.
Inspection
A chimney sweep has the training and tools to inspect your fireplace, stove, or chimney for problems such as cracks, deterioration of the chimney lining, or leaks. These problems should be addressed before they become more serious. If left untreated, chimneys can deteriorate over time and cause structural damage to your home.
Chimneys also provide a warm, cozy place for animals such as birds to build nests. Chimney sweeps are trained to safely remove animals and nests from the chimney. If animals are not removed from a chimney, it can create a fire hazard or allow carbon monoxide to enter your home. Chimney sweeps can also assess your home’s heating efficiency and recommend upgrades if necessary.
Over time, your chimney will accumulate a flammable residue called creosote from burning wood and fossil fuel. A chimney sweep can scrape this coating away from your flue and chimney lining using brushes and scrapers. This will make your chimney more efficient and safe for lighting fires.
A professional chimney sweep will evaluate your chimney to determine whether it needs a level I or II inspection. A level I inspection includes a visual examination of the chimney structure, fireplace components, and flue from both inside and outside your home.
A level II inspection is more extensive and includes a detailed examination of the chimney interior, flue, smoke chamber, and chimney components. Your chimney sweep will use a video camera lowered into your chimney flue to get a close-up look at the interior conditions of your chimney. This will help your chimney sweep find a problem early and prevent the need for more expensive repairs in the future.
Some chimneys are built in such a way that it is impossible to perform a visual inspection. In this case, your chimney sweep will use a video camera inserted into the chimney to evaluate the chimney’s conditions.
A chimney is a part of your house, but it also serves to protect you and your family from the elements. Keeping your chimney clean and free of flammable creosote and other debris is essential to your safety.
Preparation
In general, chimney sweeps will need easy access to your fireplace and the interior of your chimney. This means that you should clear the space in front of your fireplace and mantle to make sure they can get to work without having to move anything. Additionally, you should remove any logs or unused fires from your fireplace to help speed up the process and ensure that your sweep can get to all parts of your fireplace and chimney.
Once the sweep has gained access to your fireplace, they will begin the chimney cleaning process by running a brush along the entire length of your chimney and flue. This will dislodge creosote glaze and other flammable particles that have collected inside your chimney and can potentially cause house fires. During this time, the chimney sweep will also take note of any damage, cracks, and other issues that may need to be addressed with masonry repair or relining services.
As part of the chimney inspection, the sweep will look at your chimney damper and firebox to make sure they are working properly. If there are any issues with your fireplace and chimney, the sweep will be able to provide you with recommendations for professional repairs that will improve the efficiency of your fireplace and reduce the risk of future chimney problems.
The final step in chimney sweeping is to vacuum up all the dust and debris that has been removed from your fireplace, flue, and chimney. A chimney sweep will use special tools and a high-powered vacuum to ensure that as much debris as possible is removed from your home. This will prevent ash and soot from escaping into living spaces during the sweeping and inspection process, so it is important to remove any rugs or items that could be covered in ash and dust.
Ideally, you should have a tarp placed over your floor in the area in front of your fireplace to protect it from any messes that might be made. In addition, you should also consider covering furniture that is close to your fireplace or mantle in case ash or other debris gets on it.
Safety
As with any job, there are risks involved in cleaning chimneys. Chimney sweeps are trained to recognize hazards and follow specific guidelines that guarantee a safe and thorough cleaning. They also have specialized knowledge of fireplaces, chimneys, and flue pipes. They can repair a chimney’s firebox, damper, smoke chamber, and flue liner.
When a chimney sweep is on your roof or working around the chimney, they will cover the surrounding area with plastic or drop cloth to protect the floor and furniture in the room below. They will also use a vacuum cleaner with a HEPA filter to keep the ash and creosote dust away from their bodies. They will wear safety goggles and a mask to avoid soot and creosote inhalation, which can be dangerous.
They will inspect the chimney lining for damage or deterioration and recommend replacement if necessary. Damaged or deteriorated chimney liners can allow sparks and hot embers to escape the flue and ignite combustible materials in walls, ceilings, or attics. They can also cause structural damage to the chimney.
Chimney sweeps can identify problems such as cracking mortar joints, animal nests, voids, or other obstructions in the chimney. They can also check for deteriorated or damaged flue liners and chimney caps. They can also recommend new dampers, inserts, and other chimney components if needed.
The NFPA states that chimneys, fireplaces, and vents should be inspected at least once a year to ensure they are sound and free from deposits. This is a good idea, even if you only use your fireplace occasionally. A dirty chimney can lead to dangerous chimney fires, which destroy and injure homes.